
Apple Mac OS X
Nmap has supported Mac OS X since 2001, and our support has only improved over time. While Mac users can compile Nmap themselves, we also offer an executable installer. Nmap makes use of Jhbuild and gtk-mac-bundler which are used to build other projects for Mac OS X, such as OpenSSL, libapr, libsvn... Nmap is also available through systems such as MacPorts and Fink which package Unix software for Mac OS X.
Executable Installer
The easiest way to install Nmap and Zenmap on Mac OS X is to use
our installer. The
Mac OS X section of
the Nmap download page provides a file named
nmap-, where
<version>.dmg<version> is the version number of the most
recent release. The
.dmg
file is known as a
“disk image”. Installation instructions follow:
Download the file
nmap-. Double-click the icon to open it. (Depending on how you downloaded the file, it may be opened automatically.)<version>.dmgThe contents of the disk image will be displayed. One of the files will be a Mac meta-package file named
nmap-. Open it to start the installer.<version>.mpkgOn OS X 10.8 and later, you may see a dialog like Figure 2.2.
Figure 2.2. Apple Gatekeeper block screen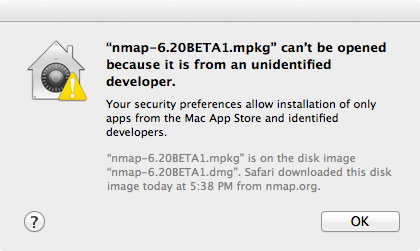
If this happens, it is necessary to right-click or control-click on the.mpkgand select “Open”, as shown in Figure 2.3.Figure 2.3. Apple Gatekeeper Open menu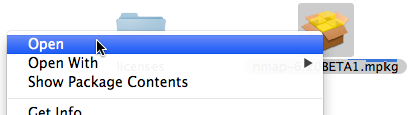
A dialog similar to the first will appear, this time having an “Open” button (shown in Figure 2.4). Click the button to continue.Figure 2.4. Apple Gatekeeper Open screen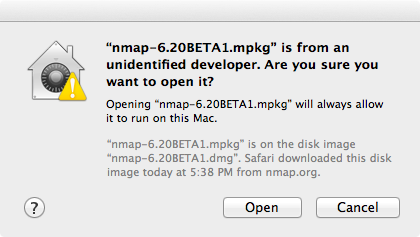
Follow the instructions in the installer. You will be asked for your password since Nmap installs in a system directory.
Once the installer is finished, eject the disk image by control-clicking on its icon and selecting “Eject”. The disk image may now be placed in the trash.
See the instructions in the section called “Executing Nmap on Mac OS X” for help on running Nmap and Zenmap after they are installed.
The programs installed by the installer will run on Intel Mac OS X 10.5 (Leopard) or later. Users of earlier versions will have to compile from source or use a third-party package. Instructions for PowerPC (PPC) Mac systems (which Apple ceased selling in 2006) are available on our wiki.
Compile from Source Code
Compiling Nmap from source on Mac OS X is no more difficult than on other platforms once a proper build environment is in place.
Compile Nmap from source code
Compiling Nmap on Mac OS X requires Xcode, Apple's developer tools that include GCC and the rest of the usual build system. Xcode is not installed by default, but can be downloaded free of charge from the Mac App Store. After installing Xcode, open “Preferences”, select the “Downloads” tab, and click the “Install” next to “Command Line Tools”.
Xcode installations don't always include the command line tools. You can install them by opening Xcode from the Applications folder, opening Preferencechoosing the Download header icon and clicking the Install button next to “Command Line Tools”.
Once you have installed Xcode and the command-line tools, follow the compilation instructions found in the section called “Linux/Unix Compilation and Installation from Source Code”. Note that on some older versions of Mac OS X, you may have to replace the command ./configure with ./configure CPP=/usr/bin/cpp. Also, on some newer Mac OS X versions, the libpcap version of the library provided by Apple may be too old. You may have to configure Nmap with the command ./configure --with-libpcap=included in order to use the compatible version included in Nmap, or you should update the libpcap installed on your machine.
Compile Zenmap from source code
Zenmap depends on some external libraries that do not come with Mac OS X, including GTK+ and PyGTK. These libraries have many dependencies of their own. A convenient way to install all of them is to use a third-party packaging system as described in Section . Once the dependencies are installed, follow the instructions in the section called “Linux/Unix Compilation and Installation from Source Code” to install Zenmap as usual.
Third-party Packages
Another option for installing Nmap is to use a system which packages Unix software for Mac OS X. The two discussed here are Fink and MacPorts. See the respective projects' web sites for how to install the package managers.
To install using Fink, run the command fink install
nmap. Nmap will be installed as
/sw/bin/nmap. To uninstall use the command
fink remove nmap.
To install using MacPorts, run sudo port
install nmap. Nmap will be installed as
/opt/local/bin/nmap. To uninstall, run
sudo port uninstall nmap.
These systems install the nmap
executable outside the global PATH. To enable Zenmap to
find it, set the nmap_command_path variable in
zenmap.conf to /sw/bin/nmap or
/opt/local/bin/nmap as described in
the section called “The nmap Executable”.
Executing Nmap on Mac OS X
The terminal emulator in Mac OS X is called
Terminal, and is located in the directory
/Applications/Utilities. Open it and a
terminal window appears. This is where you will type your commands.
By default the root user is disabled on Mac OS X. To run a scan with
root privileges prefix the command name with
sudo,
as
in sudo nmap -sS <target>.
You will be asked for a password, which is just your normal login
password. Only users with administrator privileges can do this.
Zenmap requires the X11 application to be installed. If it was not installed by default it may be available as an optional install on the Mac OS X installation discs.
When Zenmap is started, a dialog is displayed requesting that you type your password. Users with administrator privileges may enter their password to allow Zenmap to run as the root user and run more advanced scans. To run Zenmap in unprivileged mode, select the “Cancel” button on this authentication dialog.